My first computer build: Part 4 - GPU and PSU
In this fourth installment of my computer build series, we will look at the last two components of my build. Namely, the graphics card (GPU) and power supply (PSU).
Graphics card
I have spent a non negligible amount of time looking into the specifications of graphics cards that can help in making a correct purchase. To be frank, there is no lack of technical features worth covering. Some of these features, such as the GPU generation, technology node, frequency and VRAM size, are easy to wrap one’s head around. Others on the other hand, such as the count of Render Output Units (ROPs), Texture Mapping Units (TMUs), Streaming Multi-processors (SMs)/Computational Units (CUs) for Nvidia/AMD GPUs respectively1, require some understanding of the GPU pipeline which is probably beyond what a “normal” consumer would ever need to know about their GPU. Furthermore, I don’t think such knowledge is even useful when it comes to choosing a product. The truth of the matter is, GPU manufacturers (Nvidia, AMD, and more recently Intel) usually do a good job of clearly binning their products into the enthusiast, mainstream, or budget segments, and of marketing them as such. Take for example AMD’s RX6000 series of GPUs. These started from the 6950XT at the top enthusiast end, all the way down to the 6400 budget GPU. Due to this, I have to admit that in contrast to the other components we have looked into through this series, I really did not need to delve too deep into my GPU choice.
Another reason why my research into the different available GPUs was so shallow, is simply because back when I was considering my purchase at the end of 2021, availability was a huge issue. A world-wide pandemic, caused unprecedented disturbances to global supply-chains. Additionally, people were facing the prospect of spending months on end locked within their homes. This heightened interest in gaming, pushing people toward upgrading their setups, or downright building completely new systems. As if that were not enough, a rally in the price of Bitcoin and subsequently that of Etherium and other cryptocurrencies made GPU-mining extremely profitable, thus putting more stress on the market. Due to this unfortunate series of events, the global GPU supply simply dried up and the price of GPUs exploded. The MSRP (Manufacturer’s Suggested Retail Price) lost all meaning, with card prices doubling and tripling as soon as they hit the market. Things were so bad that even used cards from previous generations were being sold at a premium.
The reason I am covering all of this, is simply to make it clear that I had little say in my choice of a GPU. I had some vague criteria to guide me during my research, but at the end of the day, I could only have what I could get my hand on. In particular, below are the main criteria I held for my choice:
- I knew that I would go with an AMD GPU over an Nvidia one. AMD has demonstrated good faith in supporting the open-source community, this has had the effect of their open-source Linux drivers AMDGPU allowing for very good performances, and generally having good support. In contrast, Nvidia’s open-source Linux driver Nouveau, has been a reverse-engineering exercise with little support from the company. Seeing as I use Linux as my daily driver, and would like to use free software whenever possible, the choice here was easily made.
- As I have detailed in Part 1 of this series, an important use-case of my system would be gaming on Windows using a virtualization setup with PCI-passthrough. Without getting too deep into the details of it, such a system would require two GPUs. This is because one GPU would be used by the host system (Linux), whereas the other one would be “passed-through” to the guest system (Windows). What this means, is that the GPU used on the host system does not need to be particularly performant. The host system’s GPU will be only used for regular daily tasks (browsing, watching videos) while driving two to three monitors, with perhaps the most taxing use-cases being light processing models for 3D-printing. This meant that I could limit my search to the budget, and the mainstream models.
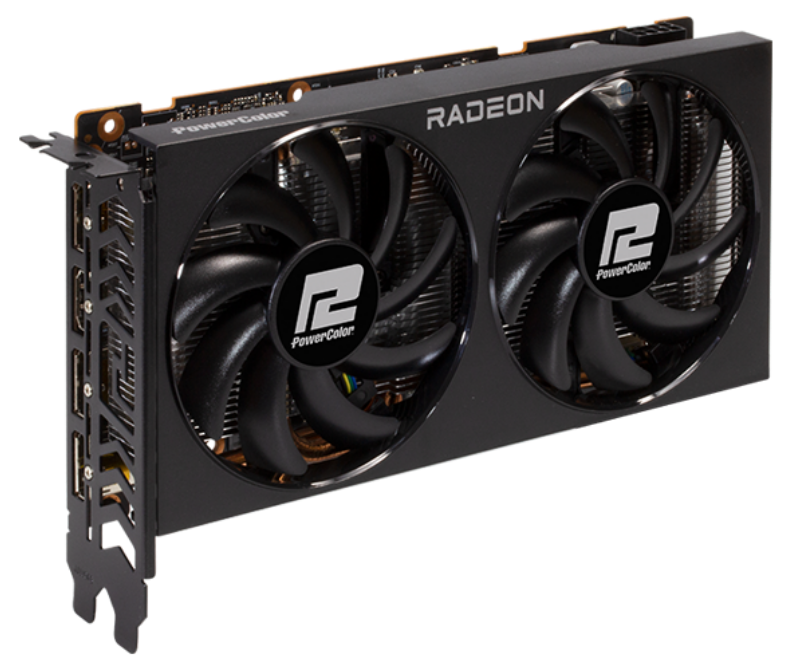
 Figure 1: PowerColor’s Fighter RX 6600XT
With the two criteria above being settled, it did not take me long to find a good candidate for my build. The Fighter RX 6600XT from PowerColor (see Figure 12), is a good middle of the road card which sports a AMD RX 6600XT GPU with a good build quality and efficient cooling design.
When announced, the 6600XT was at the bottom end of the RX6000 product stack (this has changed, with lower end cards revealed since then) The RX 6600XT was advertised by AMD as being recommended for 1080p gaming at max resolutions, positioning it below the previously announced (enthusiast) 6900XT and 6800XT, and (high-end) 6700XT, which were advertised as 4K and 1440p cards respectively3. The 6600XT came with 8GB VRAM, 32MB of cache, and 160W power rating. This contrasts with its older sibling, the 6700XT, which came with 16GB of VRAM, 96MB cache and 230W power draw. The Fighter card itself, seemed to have good reviews online4, with its cooling solution in particular receiving good praise.
Considering the specifications above, and with it being one of the few cards available to me back then (although at almost double the MSRP), I decided to go with the PowerColor Fighter RX 6600XT for my build. Before moving to the final component of my build, it is worth mentioning again that I intend to use PCI-passthrough system for gaming scenarios. As such, the PowerColor Fighter RX 6600XT will only act as my host GPU, and I will need a second GPU to be used by my guest machines. However, seeing how the stressed the GPU market was during my purchase, I opted to delay acquiring the guest GPU to a later date, as my system would still be operational with only the host GPU.
Power supply
Leaving the PSU as the last element of my build was a conscious decision. I needed to first know all other components of my build in order to calculate their power draw, so as to gauge how much power the PSU needed to be able to deliver.
Power draw estimation
| Component | TDP (W) |
|---|---|
| Ryzen 9 5900X | 105 |
| MSI MEG X570 Unify | 80 |
| Host GPU (AMD Radeon RX 6600XT) |
160 |
| Guest GPU (AMD Radeon RX 6800XT?) |
300 |
| 2x 32 RAM sticks | 5 |
| 3x M.2 SSDs | 9 |
| 2x 5400 RPM HDDs | 20 |
| 2x 140 Fans 2x 120 Fans |
20 |
| CPU Cooler with 2 x 140 Fans | 10 |
| Total (with both GPUs) | 710 |
| Estimated power draw (TDP x 1.5) | 1065 |
Table 1 summarizes the TDP (Thermal Design Power) values of the different components of my build.
We have covered TDP in Part 2 of this series where we focused on its significance in the context of the CPU power figures.
This metric is a measure of the maximum amount of heat generated by a component under nominal workload.
As such, the actual power-draw of a component is higher than its TDP.
In fact, the power draw is usually in the range of 1.5 x TDP5.
For this reason, the last row in Table 1 is the sum TDP of all components multiplied by the 1.5 factor.
Before discussing the total TDP and power draw estimated in Table 1, here are a few remarks about the listed components. When it came to the CPU, motherboard, Host GPU, RAM and the Fans (both for the case and CPU), exact figures were easy to come by as I had already settled on the specific components. As highlighted in the previous section, I still had not settled on the second GPU that would be used as guest in my PCI-passthrough use-case. As a place holder, I used the RX 6800XT, the flagship of the RX6000 series as I believed I would most probably go with it later on. Finally, I accounted for the maximum number of M.2 drives my motherboard supports (three), with possibly two additional mechanical hard drives to err on side of caution.
According to Table 1 the estimated power draw of my system is 1065W. However, this figure assumes that both GPUs will be in nominal use simultaneously, which will probably never be the case. As highlighted previously, I expect the following two main operational scenarios for my system:
- Scenario 1: Host GPU is driving two monitors (without any 3D accelerated computation), and guest GPU is idle: This will probably be how the system will spend most of its time.
- Scenario 2: Host GPU is idle (or under very low load), and guest GPU is under full load within a virtual machine.
In other terms, this means that the final figure of 1065W is probably exaggerated. It is very hard to come with any accurate measure of what the real power draw would actually look like. However, Looking around online, I found figures for both scenarios: The 6600XT draws ~20W when “idly” driving two monitors whereas the 6800XT draws an approximate 30W when idle6. Using these figures, we arrive at an average total power consumption varying from 425W up to 635W under scenarios 1 and 2 respectively. As mentioned previously, these figures are not exact, but help in getting a sense of the real power draw of the system.
PSU Efficiency
The main characteristic of a PSU is its power rating, i.e. the amount of power it can nominally output. Having arrived at a power draw figure for the system, one could be tempted to target a power supply with a power rating slightly above that figure. In our case, with an estimated maximum power draw of 635W, such a target power rating might be 650W up to 750W. However, such a reasoning would be flawed, and ignores the second major characteristic of PSUs: efficiency.
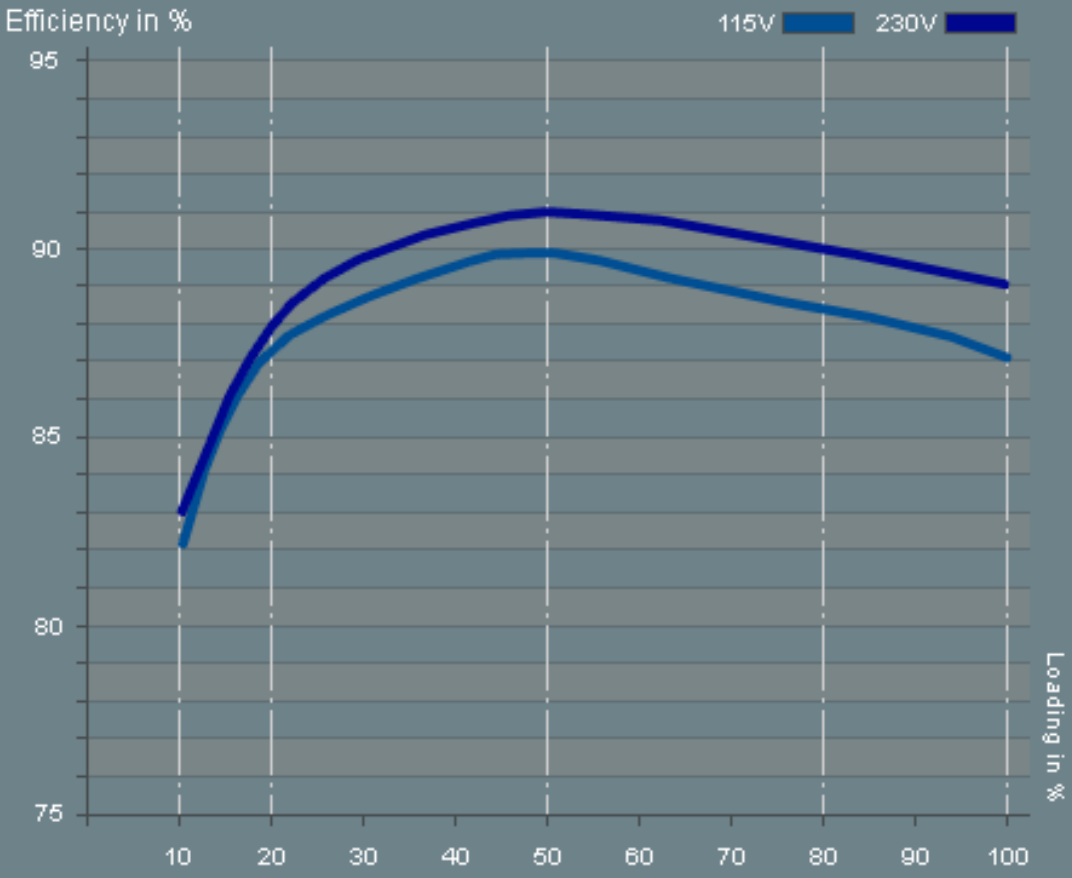
Simply put, a PSU’s efficiency is not a constant across its power delivery range. In fact, when drawn in function of its load, a PSU’s efficiency curve usually looks similar to the one in the graph shown in Figure 27.
 Figure 2: Efficiency of the Enermax Gold Modu 87+ 600W PSU
Although the efficiency curve of any given PSU will undoubtedly slightly differ from that shown in Figure 2, the following aspects will remain true:
- Below 20% load, a PSU’s efficiency drops significantly.
- As the load rises above 20%, the PSU’s power delivery is increasingly efficient, reaching a peak at a between 40% and 60% of its maximum power rating, (usually around 50%).
- Above 60%, the efficiency drops slightly as the load increases.
The main takeaway from the efficiency curve in Figure 2, is that the PSU’s power rating should ideally be double the nominal power draw of the system it is powering. This allows to use the PSU at its most efficient. Anything higher, and the PSU would be constantly under-loaded, thus not optimally efficient. Anything lower, and we run the risk of the PSU operating constantly at high load, which could decrease its lifespan. Considering the estimations from the previous section, this gives us a target PSU power rating range of 900W to 1300W.
So far in our discussion about the PSU’s efficiency, we have not yet covered the actual efficiency values that one can expect from a PSU. Practically all modern PSUs fulfill the 80 Plus certification program. This certification guarantees a power efficiency of at least 80% at 20%, 50% and 100% of the PSU’s load.
The certification additionally requires a power factor of 0.9 or greater at 100% load of the PSU. Without getting too much into the details of it, the power factor is another measure of efficiency, that reflects the current circulating through the system. This measure ranges from 0 to 1 (for non-active loads) and the rule of thumb is, the higher the power factor the the more efficient the system. As far as our discussion is concerned, the power factor is not of significant relevance.
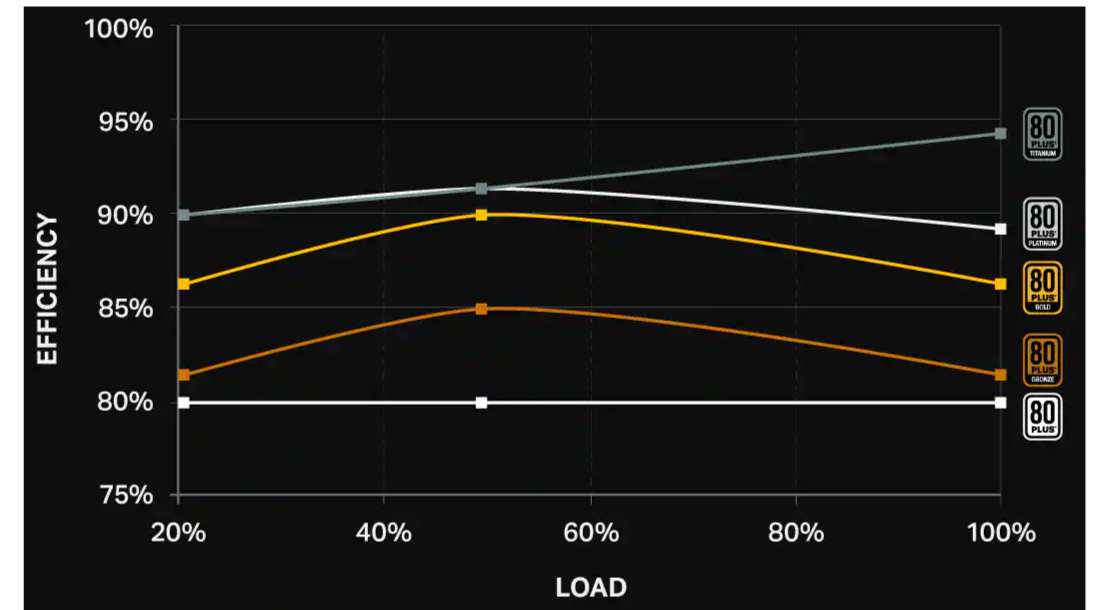
The 80 Plus certification defines multiple efficiency levels: Bronze, Silver, Gold, Platinum, and Titanium. The minimum required efficiency increases with the rarity of the level’s namesake metal. The different efficiency levels are presented in Figure 38. As a rule of thumb, 80 Plus Gold or higher is usually recommended.
 Figure 3: 80Plus efficiency levels requirements
Final choice
Following our discussion from the previous section, we now know our target to be a PSU of 900W to 1300W of 80 Plus Gold (or better) rating. Before revealing my final choice for the PSU, here is a list of additional aspects which also helped guide my choice:
- Form factor: PSUs come in different possible form factors. In Part 2 of this series, I picked the Fractal Design Meshify 2 Compact as a case. Thankfully, this case supports the largest PSU form factor (ATX) and a maximum PSU length of 165mm expandable to 200mm by removing the HDD cage.
- Modularity: A modular power-supply allows to completely disconnect cables that are not used. This allows for better cable management, and an uncluttered build. As such, my target is a modular power supply.
| Component | Power port |
|---|---|
| CPU | 2x P8 |
| Motherboard | 20+4 |
| GPU1 | 1x PCIe (6+2) |
| GPU2 | 2x PCIe (6+2) |
| Disks (2) | 2x Sata power |
- Ports count: It goes without saying that the PSU should have enough ports to connect to all the planned components of my build. Table 2 lists the different components as well as the power ports they require. Ports for the CPU, motherboard, and disks are a given. However, it is important my future PSU has enough ports to support the two GPUs I plan to have in my setup. In particular, the host GPU requires one PCIe power port, whereas the guest GPUs will require two, this sets a minimum of three PCIe ports on the PSU.
-
Power rails layout: This criteria is particularly important when it comes to the PCIe power delivery.
The power rails of a PSU, refer to the inner voltage delivery lines to which the external ports are connected. These power rails have voltages with values of 3.3V, 5V or 12V. Rails with other voltages are also available but are of lesser importance. Notably, -12V only delivers small amounts of power, and 5VSB is used for standby functions on the computer.
The PCIe ports use 12V lines for power delivery. As highlighted in Table 1, the total power draw of my PCIe devices (the two GPUs) is estimated to be 460W. This implies a current draw of460W / 12V = 38.34Aout of the PCIe ports of the PSU. This maximum estimated current draw implies one of two things:- The PSU must have the PCIe ports connected to a single 12V rail with a current rating higher than the
38.34Acalculated previously. This is highly unlikely, as this would require a large wire gauge. - The PSU must have multiple 12V rails to which the PCIe ports are connected. These rails would have a lower individual current ratings, but a combined maximum deliverable current higher than the value calculated above. This is the more likely solution, in which case, the output ports are connected to multiple power lines to allow for high current delivery.
Admittedly, a PSU with the kind of power rating I require (900W or more) will certainly have a more than satisfactory power rail layout. However, it does not harm to keep the current draw value and requirement above in mind.
- The PSU must have the PCIe ports connected to a single 12V rail with a current rating higher than the
The list of criteria from our previous discussion is probably enough to find a PSU matching my requirements. However, I have also compiled a list of other multi-GPU builds I have found online, which were also meant for PCIe passthrough use. This list has been compiled from the PcPartPicker website, by using the tag “VFIO” for filtering. VFIO stands for Virtual Function I/O, which is a term used interchangeably with PCI-passthrough (more on that in an up-coming article). My hope was to learn from the choices of other people who built setups with similar intended use to mine. I have kept only the information which helped me most relate these builds and their power profiles to mine. Namely, the CPU, GPUs and PSU. The list is available in the appendix section.
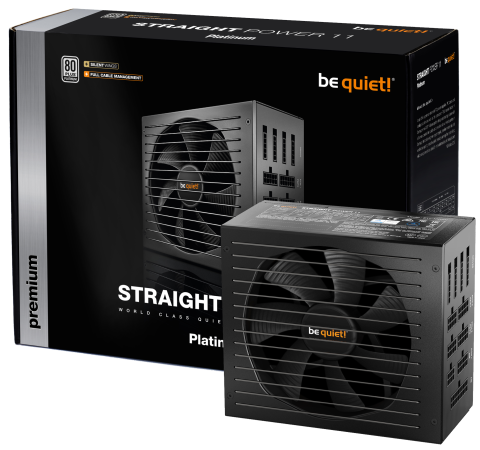
 Figure 4: The Bequiet! Straight Power 11 1200W
I quickly settled on the Bequiet! Straight Power 11 1200W Platinum. As the name suggests, this PSU has a power delivery of 1200W. Additionally, its power efficiency rating is 80 Plus Platinum, putting it at 94% efficiency at 50% load. The PSU has six PCIe ports connected to two 12V rails with 38A each, allowing for almost double the PCIe power my system will draw at maximum load. Finally, being from Bequiet!, the PSU boasts very silent operation thanks to its Silent Wing 3 fan (also from Bequiet!), has modular cabling, and comes with 5 years of warranty.
All in all, this PSU is probably on the “over-kill” side of the scale, and I believe I probably could have gotten away with a 1000W one. However, as mentioned earlier, a PSU is at its most efficient at 50% load. Additionally, an oversized PSU only means I have more room for expansion in the future!
Conclusions
This article ended up being one of the less technical of the whole series. This is in particular surprising considering how important the GPU and PSU are in a build for which gaming is one of the main scenarios. However, as detailed above, in the case of the GPU, the global situation was a stronger arbiter of a my final choice than any criteria I might have had. Additionally, the GPU question is one I will have to revisit when looking for a guest GPU for my PCI-passthrough setup. In regards to the PSU, the high power rating my dual-GPU (to-be) setup required had already put me on the higher-end of PSUs on the market, effectively, relieving me from having to go through a long and diligent search.
With this article, all the main components of my build are now settled on. All that remains is to acquire them and build everything together. That will be the subject of the next and final installment of this series. See you there!
Appendix: Other PCI-passthrough builds and their PSU rating
| Build | CPU | GPUs | PSU rating |
| 1 | Intel Core i5-6500 3.2GHz Quad-Core | Radeon HD 6670 2GB | 500 W 80+ Bronze |
| 2 | Intel Core i7-6700 3.4GHz Quad-Core | Radeon RX580 8GB | 550 W 80+ Gold |
| 3 | Intel Core i7-6700K 4GHz Quad-Core | GeForce GTX970 4GB | 600W 80+ Gold |
| 4 | Intel Core i7-8700K 3.7GHz 6-Core | GeForce GTX1080 8GB | 650W 80+ Gold |
| 5 | AMD Ryzen 7 1700 3GHz 8-Core | Radeon RX570 8GB OC GeForce GTX750 Ti 2GB |
650W 80+ Gold |
| 6 | AMD Ryzen 7 2700X 3.7GHz 8-Core | GeForce GTX1070 Ti 8GB Radeon Pro WX 5100 8GB |
750W 80+ Gold |
| 7 | AMD Ryzen 9 3900X | GeForce GTX1080 Ti 11GB GTX1650 Super |
750W 80+ Titanium |
| 8 | AMD-FX8350 | Radeon HD 8570 1GB GeForce GTX1060 6GB |
850W 80+ Gold |
| 9 | Intel Core i9-9900K 3.6GHz 8-Core | GeForce RTX2060 6GB OC | 850W 80+ GOLD |
| 10 | AMD Ryzen 9 3950X | GeForce GTX 1080Ti | 850W 80+ Platinum |
| 11 | Intel Xeon E5-2683 V3 2GHz 14-Core | GeForce RTX2080 Ti 11GB GeForce GTX980 Ti |
850W 80+ Gold |
| 12 | AMD Ryzen 5 2600X | Radeon RX VEGA 56 8GB | 1000W 80+ Gold |
| 13 | Ryzen 9 3950X | GeForce GTX980 TI Radeon RX5700 XT 8GB |
1000W 80+ Gold |
| 14 | AMD Ryzen 9 3950X | GeForce GTX660 OC 2GB Radeon RX5700 XT 8GB |
1000W 80+ Platinum |
| 15 | Intel Core i7-4960X Extreme Edition | GeForce GTX 1060 6GB FTW+ DT | 1000W 80+ Titanium |
| 16 | AMD Threadripper 1950X 3.4GHz | (3x) GeForce GTX 1070 | 1000W 80+ Gold |
| 17 | AMD Threadripper 3960X | GeForce RTX3060 Ti 8GB Radeon RX6800 XT 16GB |
1200W 80+ Platinum |
| 18 | AMD Ryzen 9 5950X | GeForce RTX3080 10GB Radeon Pro W5500 |
1200W 80+ Platinum |
| 19 | AMD Ryzen 9 3950X | GeForce RTX2080 Ti 11GB Radeon RX5700 XT |
1600W 80+ Titanium |
References
-
AMD Compute Units vs. Nvidia CUDA Cores: What’s the Difference? ↩︎
-
PowerColor Fighter AMD Radeon™ RX 6600 XT 8GB GDDR6 RADEON RX 6600 XT ↩︎
-
AMD Announces Radeon RX 6600 XT: Mainstream RDNA2 Lands August 11th For $379 ↩︎
-
Youtube: Level1Techs - AMD Radeon Red Devil and Fighter RX 6600 XT: $379!?! ↩︎
-
TechPowerUp: MSI Radeon RX 6600 XT Gaming X Review - Power Consumption ↩︎